With such a vast subject as chess, students find it less intimidating if the instructor breaks the content down into smaller “chunks.” In these articles on Checkmating Patterns, FM Sunil Weeramantry demonstrates how acquiring a solid understanding of even one small aspect of the game generates confidence in one’s abilities and can serve as a springboard for success.
All chess players will agree that the ultimate objective of chess is to checkmate your opponent. But what exactly is the best way to realize this goal? Most beginning players will attempt to score a quick knockout by setting a trap that they hope will go unnoticed by their opponent. Checkmate! How else can we explain the continuing fascination of the Scholar’s Mate? The realization that such wishful thinking is far divorced from the reality of serious tournament play is a sobering thought. Suddenly, the game does not seem quite as easy.
The serious chess player appreciates that a checkmate needs to be carefully planned and diligently executed. In order to achieve this, he needs to follow a prescribed sequence of moves from a recognizable position. These checkmating patterns are well known in positions where one of the players has been reduced to a lone king. You can learn these in our book “Great Moves: Learning Chess Through History.”
The patterns are not as familiar, however, when more material is present. Here we are going to explore a checkmating pattern in the middlegame involving the queen and the bishop. The best way to identify a pattern is to strip away all extraneous material. With this in mind, let us look at the following position:
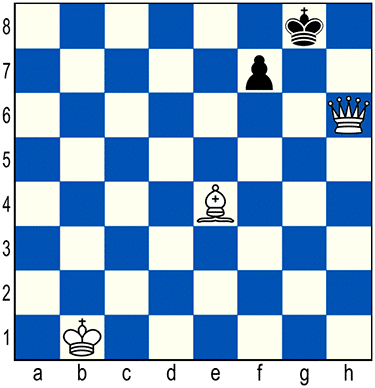
The immediate check with 1.Qh7+ allows Black’s king to slip away. White’s queen remains on h6 casting her net over the king until other pieces can take their proper positions and help execute the mate. Therefore, the correct sequence is 1.Bh7+ Kh8 2.Bg6+ (attacking the critical f7-square once more) 2…Kg8 3.Qh7+ Kf8 4.Qxf7 mate.
There are two key elements in this particular checkmating pattern: the attacking queen’s placement on h6 (a6) in relation to the defending king which is confined to g8 (b8); and the attacking bishop’s control of the long diagonal leading to h7 (a7). A player who recognizes this pattern could easily steer the game in the right direction. For instance:
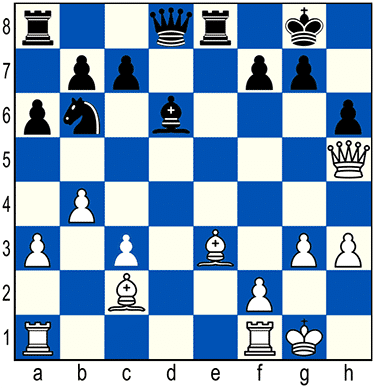
The proper conditions for the checkmating sequence can be created in two moves with the piece sacrifice 1.Bxh6 gxh6 2.Qxh6. Naturally, the presence of other pieces makes the position more complicated and may give Black some chances for survival. A close examination of this position, however, reveals that none of the defensive resources available can save Black from defeat.
Knowing that checkmate is going to be delivered on f7, Black’s first attempts at preventing this are likely to involve moves that defend this critical square. Protecting f7 by placing either the queen or rook on e7 will only seal off Black’s flight square and will lead to a simple two-move mate with 3.Qh7+ followed by 4.Qh8 mate. Playing 2…Qd7 is hardly better as White can win Black’s queen with 3.Bh7+ Kh8 4.Bf5 discovered check. There are no other reasonable ways to guard f7.
Another attempt at defense is to create more space around the king by advancing the f-pawn to f5 in order to clear the second rank. But this attempt is neatly refuted by White’s bishop switching diagonals and catching Black’s king in a crossfire: 2…f5 3.Bb3+ with mate to follow. This change of direction on the part of the bishop adds an interesting twist and illustrates the versatility of the queen and bishop attack.
You should now be able to apply this knowledge in solving the more complex example presented below.
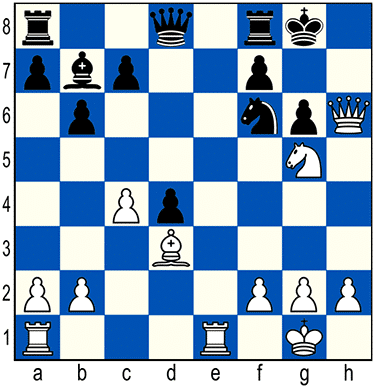
This position was reached after Black’s eighteenth move in the game Dobias-Podgorny, Prague 1952. It is apparent that Black’s king is in a mating net and the only piece standing between the king and immediate disaster is the knight on f6. A logical course of action, then, is to remove the defender. Accordingly, Dobias plays the resourceful move 19.Re6!, threatening to eliminate the knight.
But would Dobias have ever conceived of this move if he had not known the checkmating pattern with queen and bishop? I doubt it.
Play continues along a familiar path, twists and all. 19…fxe6 20.Qxg6+ Kh8 21.Qh6+ Kg8 22.Bh7+ Kh8 23.Bf5+ Kg8 24.Be6+ Resigns. It is checkmate in one after 24…Rf7 25.Bxf7+.
A winning attack often includes more than one idea. Learning to combine checkmating patterns with other attacking ideas is vital to improving one’s attacking technique.
In Dobias-Podgorny, the queen and bishop pattern was the dominant theme, while the threat of removing the guard played a secondary but significant role. In our next example, the queen and bishop pattern is hidden, but may be activated by offering a sacrifice on g5.
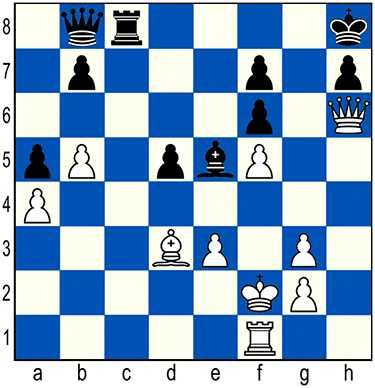
This position is given in one of the old classics of chess literature, the excellent The Art of Attack by Vladimir Vukovic. First published in 1963, a revised algebraic edition was released in 1999.
Note that the b1-h7 diagonal is blocked by White’s pawn on f5 which, in turn, is blocked by Black’s pawn on f6. As a result, White’s light square bishop is not aiming at h7. Thus, the queen and bishop pattern does not appear to be a factor in this case. But even dormant bishops can come alive given the right circumstances.
White starts with 1.Rh1 threatening an immediate mate. Black runs away with 1…Kg8 hoping to reach safety behind his central pawns should White continue with Qxh7+. However, White does not release the mating net and performs a rook lift. The most direct approach appears to be Rh4, but this runs into Black’s queen and bishop battery with …Bxg3+. As the immediate Rh4 is not playable, White plays 2.Rh5 instead, intending to sacrifice his rook on g5. If Black were to capture the rook, White’s f5-pawn would be free to advance to f6, clearing the b1-h7 diagonal for White’s bishop, and setting up our queen and bishop checkmating pattern.
Black’s only defense is to protect the critical f7-square with 2…Qc7. White counters with 3.b6! attempting to deflect the queen. Black replies with 3…Qd7 keeping f7 protected, but failing to maintain his battery.
Now that g3 is no longer under attack, White is able to bring his rook back with 4.Rh4 and the unstoppable threat of 5.Rg4 mate.
In the end, the queen and bishop checkmating pattern was not directly responsible for the mate, but was instrumental in setting it up.
© 2020 Sunil Weeramantry. This article is adapted from an earlier version published by ChessCafe.com.
The National Scholastic Chess Foundation is a 501(c)(3) non-profit educational organization. Donations are tax-deductible. Relevant IRS information is available on request.