In the previous article, we examined some aspects of how the queen and bishop coordinate in conducting a checkmating attack. This time we shall explore the manner in which rooks and bishops interact. Together they can form a dynamic and formidable duo.
While the rook and bishop are both long-range pieces, they can never form a battery as each follows its own line of movement. The maximum power that this combination of pieces generates is found at the point where the file (or rank) intersects with the diagonal. Consider the following diagram fragment:

The focal point for White’s attack is clearly g7. A forced checkmating sequence is engaged as follows: 1.Rxg7+ Kh8 2.Rxf7+ Kg8 3.Rg7+ Kh8 4.Rg6+ Rf6 5.Bxf6#.
This particular operation is conducted in two stages: forcing open the defending king’s position, and using open lines of attack to corner him. White’s second and third moves form an integral part of this sequence because any defending piece that may be able to block a line of attack must be eliminated. These moves also illustrate the use of the discovered check as an important tactic within this combination, first paralyzing the king with one of the pieces, then moving away to inflict the greatest amount of damage. This sequence is sometimes referred to as Morphy’s Mate.
When my stepson, GM Hikaru Nakamura, was 10 years old, he reached reached this position after White’s 21st move. His opponent, IM Justin Sarkar, was the 1997 US Cadet Champion. The two future stars kept the audience buzzing with their uncompromising play until Hikaru finally emerged the victor.
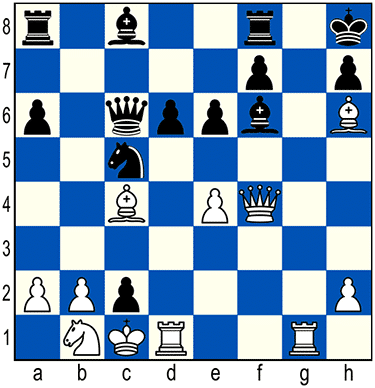
White has just played 21.Qf4!, leaving a rook and a knight en prise to Black’s c2-pawn. Black should have answered with 21…cxb1=Q+ which would have led to chances for both sides. Instead, he went for the more valuable piece: 21…cxd1=Q+ 22.Kxd1 Bd4. White recognized that conditions were right for a possible rook/bishop attack. The open lines leading into Black’s castled position had already been created. All that was needed now was to eliminate the defending bishop patrolling the long a1-h8 diagonal. Accordingly, he played 23.e5!, preparing to execute a typical Morphy’s Mate should Black reply with 23…Bxe5. Play would then continue: 24.Qxe5! dxe5 25.Bg7+ Kg8 26.Bf6+, with mate to follow. Black averted this with 23…f5 but lost in short order after 24.Qxd4.
Naturally, once the basic pattern is understood, the player can add a few frills of his own. Consider this position from the game Petrushin-Vlasov, USSR 1970, which is shown in John Littlewood’s very informative book, How to Play The Middle Game in Chess.
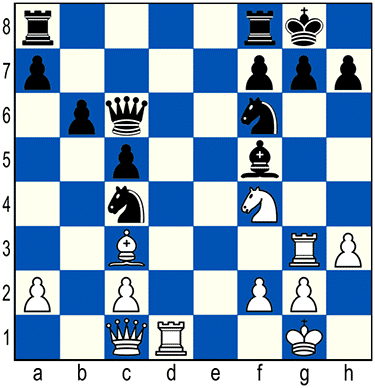
White is down a piece, but has ample compensation in the form of a potential assault on Black’s castled king. White must have been gazing at the g7 focal point in eager anticipation. There follows 1.Nd5 Nxd5 2.Rxg7+ Kh8. But what now? White’s bishop on c3 is under attack. The solution is elegant. 3.Rxd5 Qxd5 4.Bf6! paralyzing Black and making Ne5 irrelevant. Now, even if Black attacks the bishop with 4…Qe6, he cannot avoid getting checkmated after 5.Qg5.
Destructive sacrifices constitute the most direct means of shattering the king’s defenses. We looked at this inspired effort by the great Paul Morphy against Louis Paulsen in our earlier article on Value & King Safety.

As seen before, Morphy sacrifices his queen with 17 …Qxf3!!
The first time I played through this game, I could not help wondering whether I would ever have conceived of this move. The idea of sacrificing a queen with only limited material remaining on the board is a thought that most players would rapidly discard. All too often players dismiss options like this without further consideration. But let us suppose that a player is familiar with rook and bishop attacking patterns. He sees the open files and the open diagonals, all leading to a king that has limited mobility. Would he not be more likely to entertain the notion of this sacrifice?
Once the idea of a queen sacrifice is formed, calculating the exact sequence of moves that lead to victory is a simpler task. Black will have no difficulty dictating the course of the game by continuing to create threats and retaining the initiative: 18.gxf3 Rg6+ 19.Kh1 Bh3.
Black is threatening a simple win with Bg2+ and Bxf3 mate. White cannot defend against this threat by protecting g2 with 20.Rg1, because Black would answer with 20…Bg2+ 21.Rxg2 Re1+ 22.Rg1 Rexg1 mate. Since defending g2 is impossible, Paulsen creates an escape square for his king: 20.Rd1.
The game continues 20…Bg2+ 21.Kg1 Bxf3+ 22.Kf1.
While Morphy goes on to win this game in convincing style, he can end it right here while remaining true to the typical rook/bishop attacking formation with 22…Rg2. This threatens …Rxh2 and …Rh1 mate. If White now chooses to attack the bishop on f3 with 23.Qd3, for example, Morphy can execute a forced checkmate with 23…Rxf2+ 24.Kg1 Rg2+ 25.Kh1 Rg1 mate. The intersecting lines of attack with focal points on f2, g2 and g1, along with the tactical ideas of discovered and double check, blend together for a triumphant victory.
Each example provided thus far features open lines that already exist, or are created by capturing a defender. However, sometimes opening lines to the enemy king may require a more creative solution. We turn for inspiration to Akiva Rubinstein, a creative genius if ever there was one. Perhaps Rubinstein himself was inspired by the earlier Morphy-Paulsen game.
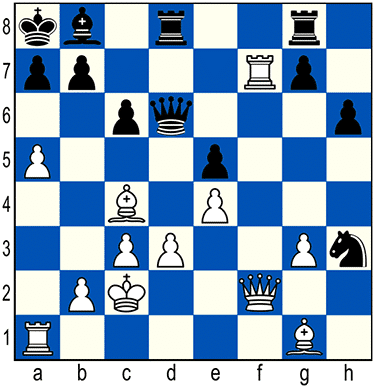
Rubinstein plays the brilliant 25.Qb6!! After all, if you cannot force open a position by taking something, ask your opponent to assist you. Black wisely declines the offer; still, he resigns a few moves later. Had he taken White’s queen with 25…axb6, play would have proceeded as follows: 26.axb6+ Ba7 27.Rxa7+ Kb8 28.Rfxb7+ Kc8 29.Ba6. And, once again, the rook and the bishop work together to set up mate.
© 2020 Sunil Weeramantry. This article is adapted from an earlier version published by ChessCafe.com.
The National Scholastic Chess Foundation is a 501(c)(3) non-profit educational organization. Donations are tax-deductible. Relevant IRS information is available on request.